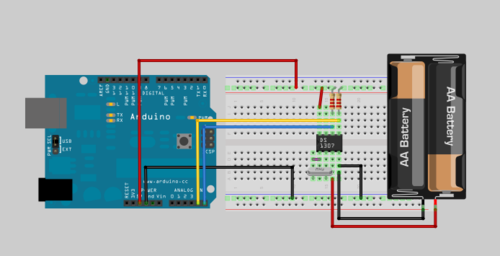
Uno de los retos que cruzaran en el camino de cualquier
proyecto ensayo para arduino medianamente serio será guardar la hora. Para ello necesitaremos un RTC podemos usar muchos integrados como pueden ser DS3234,DS1305,DS1307. Las diferencias suelen ser el protocolo de comunicación y/o el tipo de encapsulado. En este caso usaremos el
DS1307. Un IC en formato DIP y comunicación i2c o sqw*
Para empezar vamos a montar el tinglado
Y finalmente el código
//
// Maurice Ribble
// 4-17-2008
// http://www.glacialwanderer.com/hobbyrobotics

// This code tests the DS1307 Real Time clock on the Arduino board.
// The ds1307 works in binary coded decimal or BCD.  You can look up
// bcd in google if you aren't familior with it.  There can output
// a square wave, but I don't expose that in this code.  See the
// ds1307 for it's full capabilities.

#include "Wire.h"
#define DS1307_I2C_ADDRESS 0x68

// Convert normal decimal numbers to binary coded decimal
byte decToBcd(byte val)
{
  return ( (val/10*16) + (val%10) );
}

// Convert binary coded decimal to normal decimal numbers
byte bcdToDec(byte val)
{
  return ( (val/16*10) + (val%16) );
}

// Stops the DS1307, but it has the side effect of setting seconds to 0
// Probably only want to use this for testing
/*void stopDs1307()
{
  Wire.beginTransmission(DS1307_I2C_ADDRESS);
  Wire.send(0);
  Wire.send(0x80);
  Wire.endTransmission();
}*/

// 1) Sets the date and time on the ds1307
// 2) Starts the clock
// 3) Sets hour mode to 24 hour clock
// Assumes you're passing in valid numbers
void setDateDs1307(byte second,        // 0-59
                   byte minute,        // 0-59
                   byte hour,          // 1-23
                   byte dayOfWeek,     // 1-7
                   byte dayOfMonth,    // 1-28/29/30/31
                   byte month,         // 1-12
                   byte year)          // 0-99
{
   Wire.beginTransmission(DS1307_I2C_ADDRESS);
   Wire.send(0);
   Wire.send(decToBcd(second));    // 0 to bit 7 starts the clock
   Wire.send(decToBcd(minute));
   Wire.send(decToBcd(hour));      // If you want 12 hour am/pm you need to set
                                   // bit 6 (also need to change readDateDs1307)
   Wire.send(decToBcd(dayOfWeek));
   Wire.send(decToBcd(dayOfMonth));
   Wire.send(decToBcd(month));
   Wire.send(decToBcd(year));
   Wire.endTransmission();
}

// Gets the date and time from the ds1307
void getDateDs1307(byte *second,
          byte *minute,
          byte *hour,
          byte *dayOfWeek,
          byte *dayOfMonth,
          byte *month,
          byte *year)
{
  // Reset the register pointer
  Wire.beginTransmission(DS1307_I2C_ADDRESS);
  Wire.send(0);
  Wire.endTransmission();

  Wire.requestFrom(DS1307_I2C_ADDRESS, 7);

  // A few of these need masks because certain bits are control bits
  *second     = bcdToDec(Wire.receive() & 0x7f);
  *minute     = bcdToDec(Wire.receive());
  *hour       = bcdToDec(Wire.receive() & 0x3f);  // Need to change this if 12 hour am/pm
  *dayOfWeek  = bcdToDec(Wire.receive());
  *dayOfMonth = bcdToDec(Wire.receive());
  *month      = bcdToDec(Wire.receive());
  *year       = bcdToDec(Wire.receive());
}

void setup()
{
  byte second, minute, hour, dayOfWeek, dayOfMonth, month, year;
  Wire.begin();
  Serial.begin(9600);

/*
  // Change these values to what you want to set your clock to.
  // You probably only want to set your clock once and then remove
  // the setDateDs1307 call.

  second = 00;
  minute = 15;
  hour   = 22;
  dayOfWeek  = 5;
  dayOfMonth = 27;
  month      = 11;
  year       = 11;
  setDateDs1307(second, minute, hour, dayOfWeek, dayOfMonth, month, year);
*/
}

void loop()
{
  byte second, minute, hour, dayOfWeek, dayOfMonth, month, year;

  getDateDs1307(&second, &minute, &hour, &dayOfWeek, &dayOfMonth, &month, &year);

  Serial.print(hour, DEC);
  Serial.print(":");
  Serial.print(minute, DEC);
  Serial.print(":");
  Serial.print(second, DEC);
  Serial.print("  ");
  Serial.print(month, DEC);
  Serial.print("/");
  Serial.print(dayOfMonth, DEC);
  Serial.print("/");
  Serial.print(year, DEC);
//  Serial.print("  Day_of_week:");
//  Serial.println(dayOfWeek, DEC);

  delay(1000);
}
Hay mucho otro código válido para el DS1307, incluso arduino tiene librerías enteras para él pero este es el que mejor resultado me ha dado.
fuente: en este caso el código lo saqué de el
blog de carballada
*no tengo ni idea sobre ello!